Best Practices for Leak Detection
8 Tips and Tricks from Our Leak Detection Experts

Leak testing is a critical step in ensuring the integrity and performance of various components in manufacturing and maintenance processes. Whether you're working in automotive, HVACR, or any other industry where leak detection is crucial, following best practices can save you time, money, and prevent costly failures down the line. Below, we share eight expert tips to help you master leak detection and achieve accurate leak test results.
1. Evacuate Before Filling with Tracer Gas
When preparing a component for leak testing, it’s critical to remove all the air from the test part before introducing the tracer gas. This process, known as evacuation, is especially important for components with complex shapes or long, narrow internal pathways. Let us explain why.
- Air Left Inside: If there's still air inside the part, it can stop the tracer gas from reaching all areas. This means that when a leak occurs, only the trapped air might escape, and not the tracer gas, which your leak detection equipment won't detect.
- Dilution of Tracer Gas: When air and tracer gas mix, the concentration of the tracer gas is reduced. For instance, if you fill a part with air at normal pressure (1 atmosphere) and then add tracer gas at the same pressure, the tracer gas concentration inside the part will only be 50%. This can really affect how sensitive your leak detection is, making it harder to spot small leaks.
")
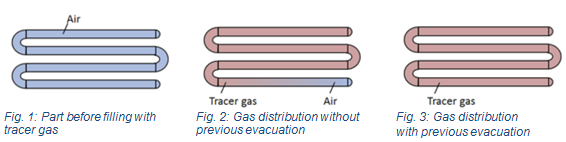
Evacuating the air ensures that the tracer gas fills the whole component evenly, so you can spot leaks more accurately. Read more about the importance of pre-evacuation in our Application Note!
2. Avoid Water Bath Testing Before Tracer Gas
Leaks often show up as tiny capillaries that can easily get clogged with water if the part is submerged in a water bath before tracer gas testing. The water, because of its surface tension, tends to stay trapped in these small openings, making it difficult to remove without a lengthy drying process. If the tracer gas can't get into the leak, it could lead to false negatives. Drying out these tiny leaks is a slow process, which can delay testing and reduce productivity.
3. Prevent Tracer Gas from Contaminating the Test Area
How well your leak test works depends a lot on keeping the background concentration of tracer gas in the testing area low. If you release tracer gas into the environment after testing or accidentally spill it during filling, it can increase the background level, which makes it harder to detect small leaks. In addition, leak testing takes longer because the operator must often repeat the test to distinguish between leaks and background tracer gas. Make sure your testing area stays clean by checking your connectors for leaks and avoiding unnecessary tracer gas releases.
Curious to see the consequences of inaccurate tracer gas release? Watch our animation!

4. Check for Large Leaks Before Tracer Gas Filling
Before introducing tracer gas, it's a good idea to quickly check for any large leaks. This can be done by evacuating the part and observing whether it can maintain the evacuation pressure. If the part can't hold pressure, it's likely got a big leak that could let a lot of tracer gas out into the environment, contaminating the test area. By identifying and repairing large leaks first, you can prevent unnecessary contamination and make sure the testing environment is more controlled.
The Tracer gas Fillers from INFICON help you detect gross leaks and make leak detection more efficient. Discover more!
5. Ensure Proper Ventilation in the Testing Area
Contrary to what you might expect, tracer gases like helium and hydrogen do not simply rise to the ceiling like a balloon. Instead, they form clouds that can move around the testing area. Even with perfectly tight connectors, some amount of tracer gas may be released during the process of connecting and disconnecting. To manage this, ensure that your testing area has good ventilation. Since tracer gases tend to move upwards, it’s recommended to introduce fresh air at the bottom of the testing area and have exhaust ventilation at the top. This setup helps to efficiently remove tracer gas from the environment and maintain a low background concentration. Using curtains to separate the leak test area from the gas charging area can help.
6. Test in the Same Direction as Operational Pressure
Many seals, such as radial shaft seals, are designed to work well only when pressure is applied in a certain direction. If you test these seals in the opposite direction, they might leak, which could give you the wrong idea about whether they're defective. Testing in the operational direction makes sure you're catching real problems, not just false positives.
7. Test at the Maximum Operational Pressure
The pressure at which you test a component is crucial for accurate leak detection. Let us explain why.
- Pressure Thresholds: Some seals and materials only start to leak at certain pressure levels. If you test at pressures lower than what the component will experience in use, you might miss these leaks entirely. On the other hand, testing at pressures higher than what the component will experience in service might reveal leaks that would never occur during normal operation.
- Operational Pressure vs. Atmospheric Pressure: The atmospheric pressure is the pressure exerted by the weight of the atmosphere. It's typically measured as 1 atmosphere (atm) at sea level. It's the baseline pressure that most people are familiar with, and it's used as a reference point for many pressure measurements. The operational pressure is the pressure that a component or system sees when it's actually being used. It can be much higher or lower than atmospheric pressure, depending on what it's being used for. For example, an HVAC system might operate at pressures well above atmospheric to circulate refrigerant through the system. Testing components at their maximum operational pressure helps you spot any leaks that might occur in the real world. This gives you a more accurate picture of how they're performing.
8. Avoid Cross Winds When Sniffing for Leaks
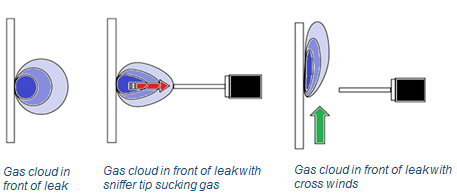
The way air moves in your testing environment can make a big difference in how well you can use a sniffer to find leaks. Cross winds, which are caused by temperature differences or forced air from fans, can blow the tracer gas away from the sniffer tip, which makes it harder to detect leaks accurately. To get the best results, make sure your leak testing area is protected from these winds. This will help create a stable environment for accurate detection.
By following these tips, you can make your leak testing processes more reliable and accurate. From the right way to get rid of the old product to making sure everything's safe and controlled when you test it, each step is important for finding even the tiniest leaks. This means you'll make better products and have fewer problems when you're using them. No matter if you're testing components in a production setting or troubleshooting in the field, these practices will help you get the best possible results from your leak detection efforts.

Want to Learn More about Accurate Tracer Gas Filling and Evacuating?
Read about the importance of correct tracer gas handling or watch our on-demand webinar “Not finding all relevant leaks? The essentials of tracer gas handling”.
Interested in More Tips&Tricks from Our Leak Detection Experts?
Read about the Top 5 Mistakes in Calibration and How to Avoid Them